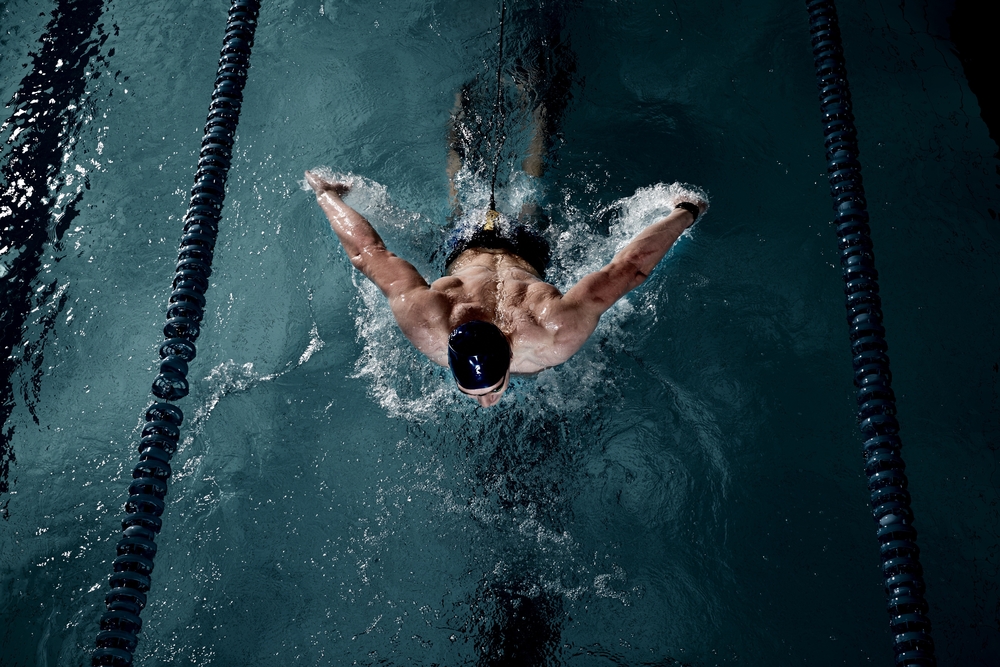
Dryland Swim Exercises
I've had a number of requests lately when it comes to sport-specific exercises...
"SJ, I don't want to get massive I just want to improve my performance as a swimmer."
"I can't get to the pool this winter but I want to build upon my swimming muscles, what can I do?"
Ask and you shall receive! Let's take a look at 6 key dryland swim exercises that'll improve your performance in the pool along with a workout you can perform a few times a week.
Whether you use this regime to cross-train while you're unable to get in the pool or you use this regime as a supplement to your existing swimming training - that's up to you.
Try These 6 Dryland Swim Exercises!
1. Dumbbell Shoulder Press
The overhead press is the best size and strength builder for the shoulders that’s out there, when it comes to shoulder training too many guys are working on excessive amounts of isolation via exercises such as the front raise, dumbbell lateral raise and rear deltoid fly… these exercises are useful for isolating the different heads of the shoulder however to build overall mass and powerful shoulder strength you need to be pressing heavy!
Movement: Isolation
Targets: Shoulders
Required: Dumbbells & Bench
Dumbbell Shoulder Press Form
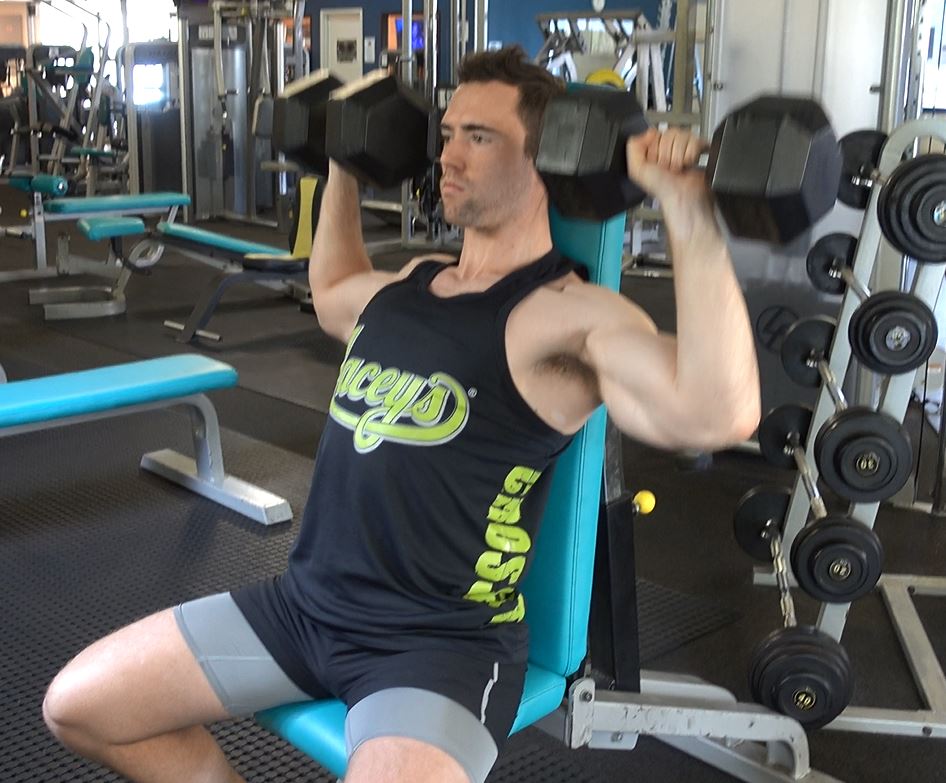
Hold a dumbbell in each hand, place them on your thighs and sit on a bench with a back support (adjust an incline bench if necessary).
Kick your knees up one at a time to raise the dumbbells into place and twist your wrists away from you (palms facing forward).
As you breath out drive the dumbbells upward while maintaining them as inline with your body as possible.
Contract at the top of the repetition for one second.
Slowly lower the dumbbells back down to the starting position.
Dumbbell Shoulder Press Variations
Arnold Press
A twisting variation of the dumbbell shoulder press, activating each head of the deltoids.
Kettlebell Press
Pressing a kettlebell overhead as opposed to a dumbbell, utilizing different weight distribution.
Unilateral Shoulder Press
Performing one side at a time while holding the other dumbbell in place, increasing core activation.
Common Dumbbell Shoulder Press Mistakes
Too Much Weight
You should be lifting a weight on your presses that you actually can lift with correct form for your prescribed number of repetitions.
If you’re struggling to get the weight up you’re setting yourself up for disaster.
Leaning forwards, falling backwards, utilizing momentum to drive the dumbbells upwards while pushing it away from your body… when excessive amounts of weight is used for pressing movements you’ll naturally do whatever you can to get it overhead.
Form ALWAYS comes first, muscling weight that’s too heavy for you to manage before dropping it on your head isn’t going to help you build the shoulder strength and size you want.
Not doing Full Range Of Motion
Don’t expect to reap all the results of the shoulder press if you’re only working half of the range of the exercise.
This is without a doubt the most common mistake I see being made with most exercises, and the shoulderpress is no exception! Your arms should be locked out at the top of each repetition with the dumbbells directly above your head. When lowering the barbell it should come all the way down – don’t stop once the dumbbells are in line with your ears and your arms are parallel, you aren’t working the shoulders in their entirety.
Not Pushing Vertically
The dumbbells should take the shortest path to the top – this is directly in-line with your body.
You should solely be pressing upward, not forwards or backwards.
Not only does pressing forward place more emphasis on the chest and front deltoids (as opposed to working the entire shoulder) you’ll struggle to lift the weight once you’re going heavy as this is more of an isolater and your balance can also be compromised as you push the weight infront of you, making it a struggle to maintain your ground without falling forward.
2. Pull-Ups
Pull-ups are a functional exercise and in my opinion are the best back exercise for upper back mass.
If you can’t perform weighted pull-ups perform bodyweight pull-ups, if you can’t perform body-weight pull-ups perform assisted pull-ups or simply jump up and grab the bar while focusing on the negative portion of each repetition.
The only way to get better at pull-ups is to do them! Don’t skip pull-ups simply because you find them a struggle (I recall repping out sets of weighted dips with a 45lb plate before I could even perform 1 proper form wide grip pull-up, so don’t get discouraged!).
Movement: Compound
Targets: Back & Biceps
Required: Pull-Up Bar
Optional: Weight Belt
Pull-Ups Form
With Arms fully extended and slightly wider than shoulder-width grasp your pull-up bar and assume a dead hang position.
Tilt your head to look slightly upward and maintain a small arch in your back, this will create the slight angle you'll maintain in your torso for the duration of the set.
Drive your arms down and back, pulling through your lats until your chin clears the bar.
Slowly lower yourself back down to the dead hang starting position.
Repeat for the desired number of repetitions with this full range of motion.
Pull-Up Variations
Towel Pull-Ups
Instead of gripping directly onto your pull-up bar opt to hold onto either end of a towel, draping it over your pull-up bar.
The towel pull-up is harder than it looks and is fantastic for developing both grip and core strength as well as smashing the lats.
Chin-Ups
Form wise the chin-up is the same as the pull-up however you'll be utilizing an underhand, closer grip - placing greater emphasis on the biceps.
Neutral Grip Chin-Ups
Form wise the chin-up is the same as the pull-up however you'll be utilizing a neutral hammer style grip (palms facing inward).
Additional emphasis is placed on the biceps and forearms.
Weighted Pull-Ups
Easily hitting sets of 10 or above with your regular pull-ups? Time to increase the resistance! Use either a dip belt with a weight plate or lock a dumbbell between your legs.
Common Pull-Up Mistakes
In order to add size and increase back strength we need to be using our back when we’re performing pull-ups.
By default most guys attempt to pull through their arms (especially when lifting heavy) as opposed to their lats… this results in a bicep pump and a half assed back workout.
Using correct form and ensuring you’re activating the right muscles requires conscious effort without a doubt.
At the beginner of each set I ensure I lean back and have a slight arch in my back to ensure I’ll be driving through my lats to pull myself up to the bar.
Sitting completely upright or hunching forward is a sure-fire way to set yourself up to struggle the weight through your arms.
3. Dumbbell Goblet Squat
The goblet squat is an excellent lower body exercise, particularly if you don't have a spotter to assist with heavy barbell squats.
All you're going to need for the goblet squat is a single dumbbell and a small amount of space! There's no excuse to neglect your lower body when the goblet squat, walking lunge and a series of other basic, no-frills exercises exist to build a powerful, functional lower body.
Movement: Compound
Targets: Quads, Hamstrings, Glutes, Calves
Required: Dumbbell
Dumbbell Goblet Squat Form
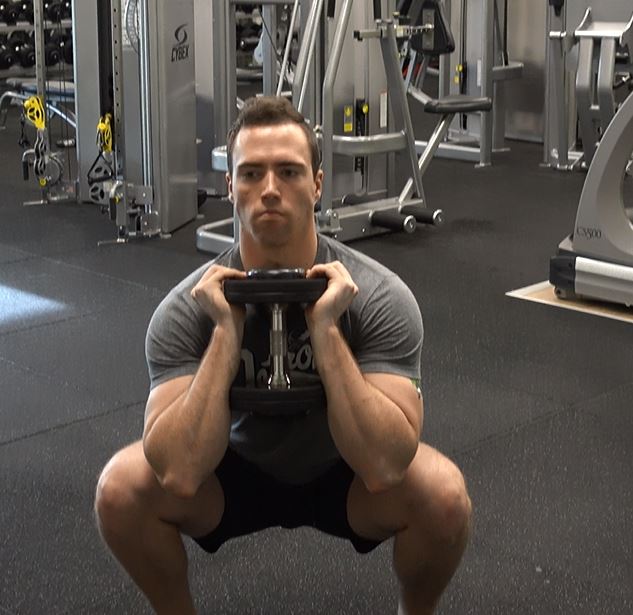
Grasp a dumbbell close to your chest, holding with both hands.
With the dumbbell in place proceed to squat down as low as possible, maintain an upright torso and continue to look forward.
Drive through your heels to raise yourself back up.
Dumbbell Goblet Squat Variations
Kettlebell Squat
Grasp one kettlebell by its handle with both hands at chest height and proceed to perform a goblet squat.
Common Dumbbell Goblet Squat Mistakes
If I had to choose only 3 exercises to perform for the rest of my days in the gym, the squat would be one of them. Needless to say the traditional barbell squat is the best lower body exercise in existence. The barbell back squat when performed correctly will hit your quads, hamstrings, glutes and calfs, and unlike machine based exercises such as the leg extension the barbell squat can safely be performed with heavy weight – allowing us to continually apply progressive overload and build up strong, functional legs.
The leg press, leg curls, leg extensions, dumbbell lunges… all of these exercises come second to the squat.
The squat has stood the test of time and should be included in every leg workout, with many different variations (based on foot placement and bar placement).
When training legs, strict form and a full range of motion must be utilized to activate and overload the muscles being targeted.
Squat half reps, a minuscule leg press range of motion, not dropping your knee low enough on dumbbell lunges… if you’re constantly limiting your range of motion you’re not going to be able to build either the size or strength you’re chasing.
A limited range of motion is usually due to one of the following three reasons:
Lifting Too Heavy
When squatting or using the leg press ‘getting out of the hole’ aka. the bottom portion of the movement is without a doubt the hardest. If you’re performing half reps because you’re unable to get the weight out of the hole it’s a clear sign you’re lifting too heavy. Stacking more and more weight on the bar or the machine may make you feel good… but you won’t see that weight translate into size or strength gains. Check your ego at the door and lift weight which you’re able to manage (while still being a challenge in the prescribed rep range) utilizing a full range of motion.
Poor Mobility
If you’re new to the gym and you’ve spent the last decade working in an office day in day out chances are your mobility isn’t the greatest. Constant practise combined with stretching, foam rolling and a mobility routine will have you getting low on those squats in no time, tight hip flexors (from sitting all day) are notorious for this.
Being Lazy!
There’s nothing pretty about dropping your ass to the grass with 350lbs on your back, multiple times at 5am in the morning. But the feeling of accomplishment, constant progression, mental fortitude and discipline it builds is worth it.
Squatting heavy with a full range of motion sucks, but if you’re using the right weight and you’ve developed the mobility to work a full range of motion you have no excuse.
4. Kettlebell Russian Twist
The kettlebell russian twist is a great core based exercise to target the obliques.
Movement: Isolation
Targets: Abdominals & Obliques
Required: Kettlebell
Optional: N/A
Kettlebell Russian Twist Form
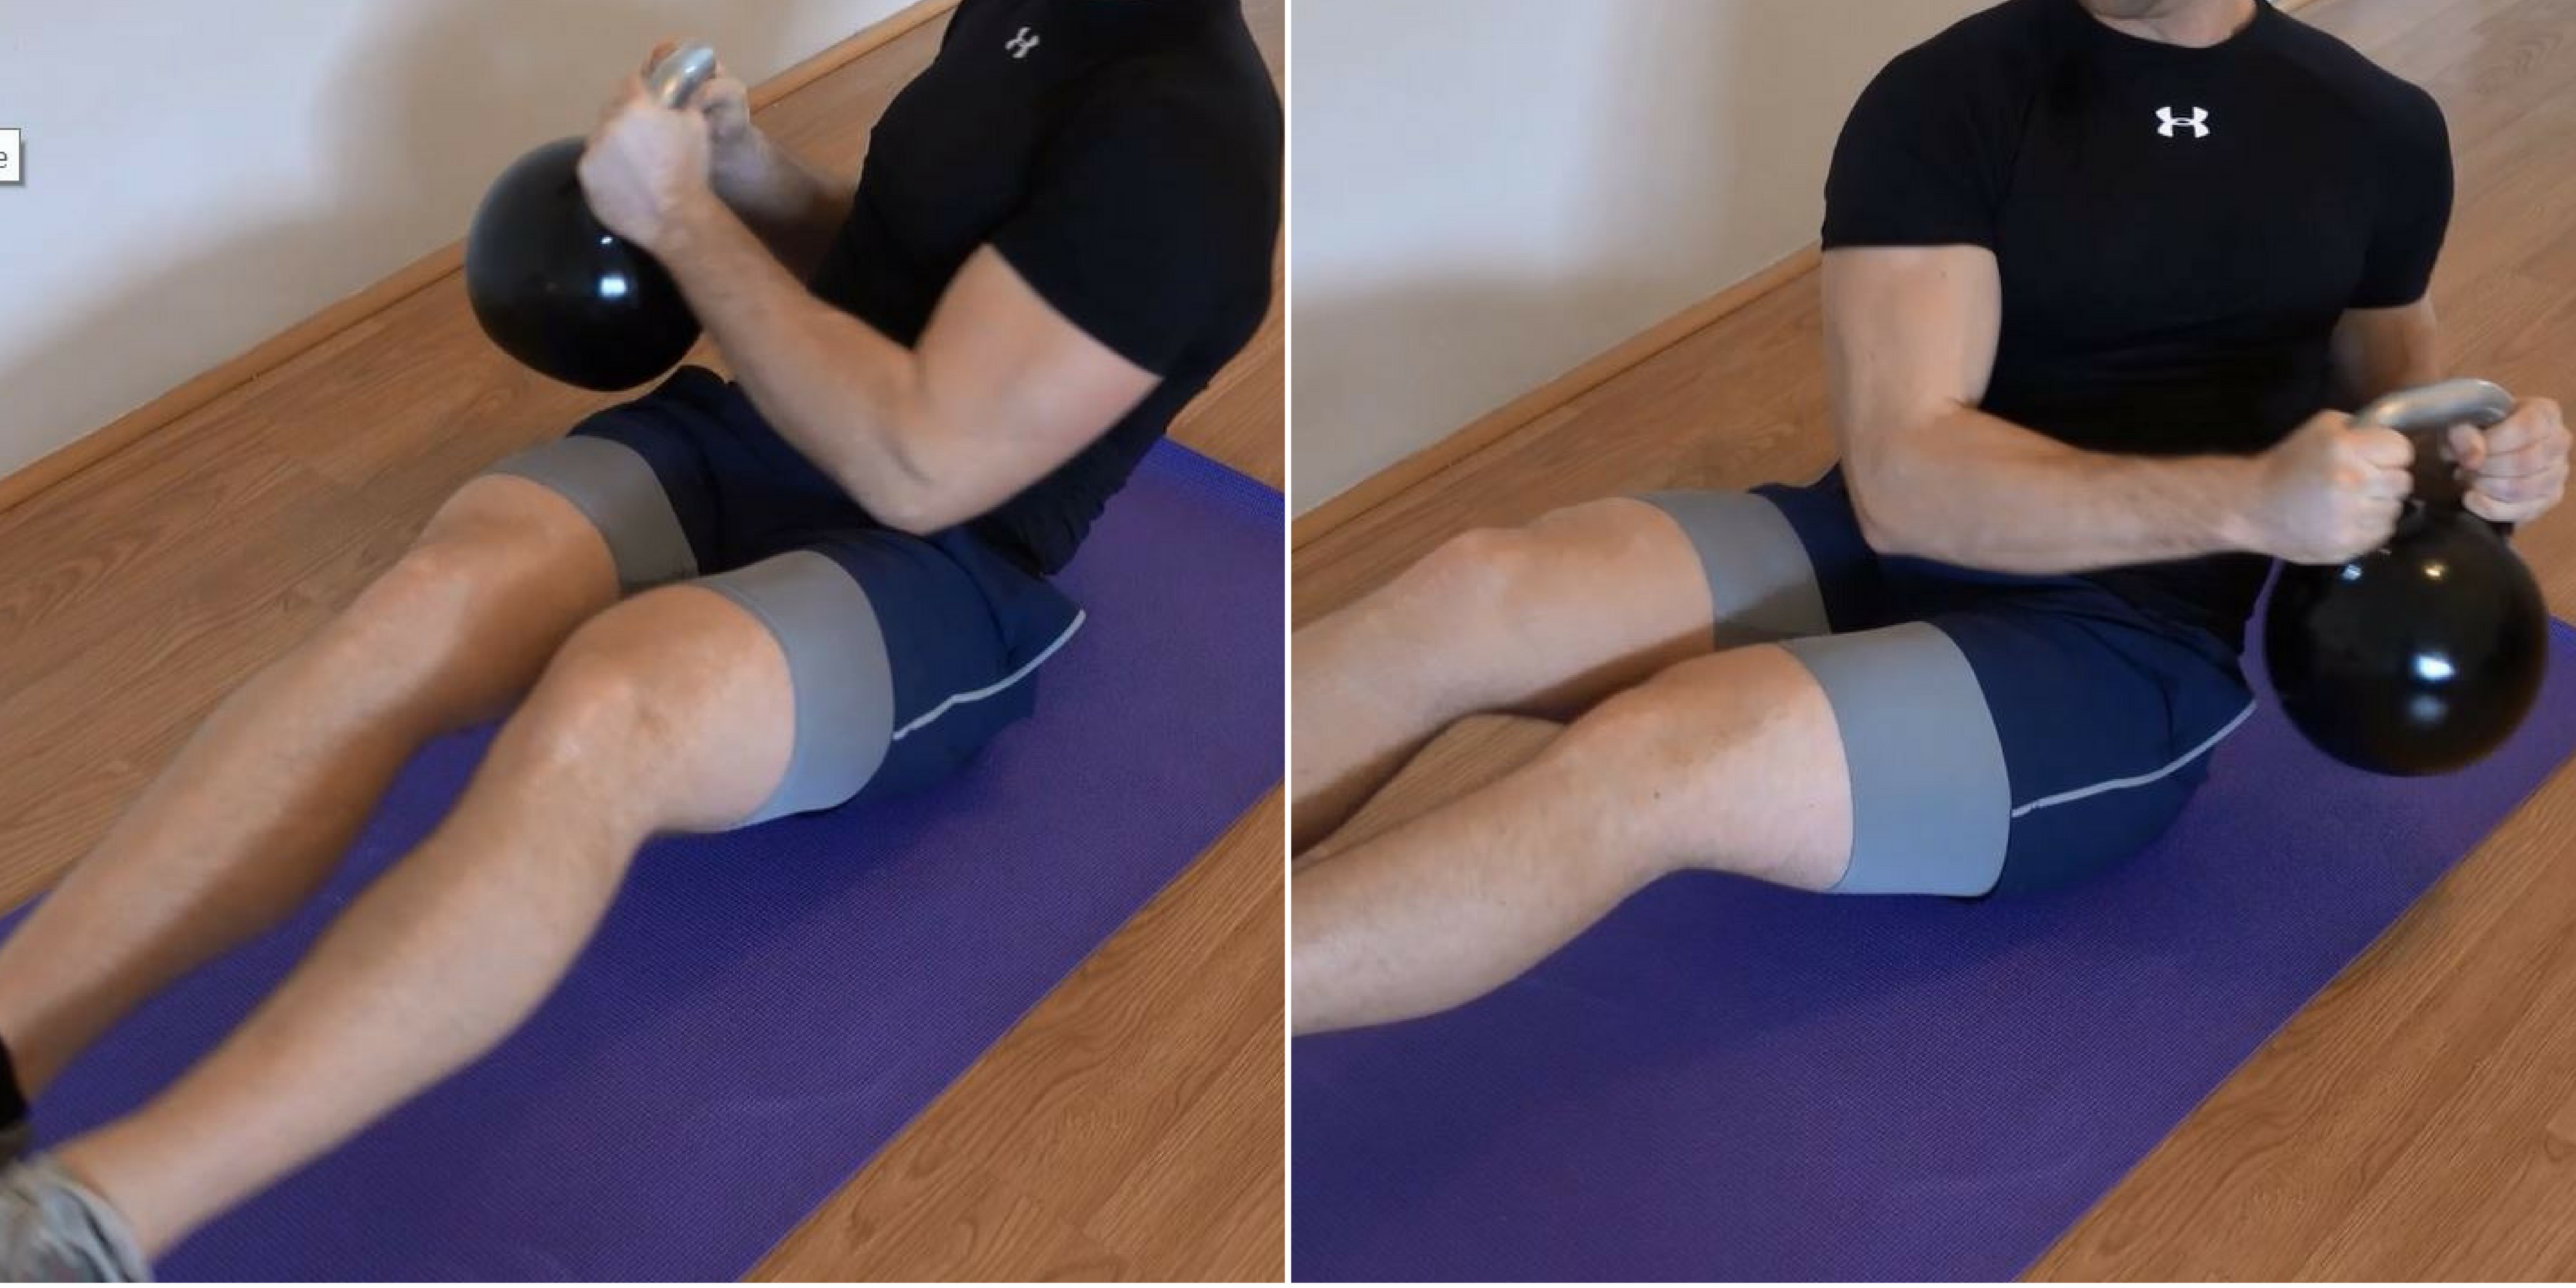
Lay down on an exercise mat with your legs bent at the knee.
Raise your upper body, essentially forming a V' shape with your torso and legs.
While holding a kettlebell in both hands by the 'horns' of the kettlebell twist your torso as far as possible from left to right with the kettlebell extended in front of your torso.
Continue to alternate sides for the desired number of repetitions.
Kettlebell Russian Twist Variations
Heel Touches
With your shoulder blades off the ground and your legs in close to your body proceed to alternate tapping your left hand to your left heel and your right hand to the right heel while leaving your shoulders off the ground for the duration of the set.
Common Kettlebell Russian Twist Mistakes
Training Abs Too Frequently
Abdominal training is a lot easier than many make it out to be.
You do not need to train abs every single day, in fact if you’re training them hard it’s detrimental to progress.
You do not need to dedicate entire workouts to your abs.
Like all other muscle groups, the abs require time to recover after they’ve been hit hard.
I recommend throwing in a 15 minute ab workout 2 – 3 times per week at the end of your regular workout… do not train abs first before you go into heavy squats or deadlifts as your core will be fatigued and will become the weak link in your exercises.
Thinking Ab Exercises Will Get You Abs
The cliche saying, ‘abs are made in the kitchen’ is correct.
Six pack abs are the result of low body fat, for men the abs start popping around 10% body fat and continue to get more defined as you delve down into the single digit body fat range. For women, abs are visible around 15% body fat.
In order to burn fat and get down into this low body fat range we need to subject our body to a calorie deficit (i.e. be consuming less calories per 24 hour basis than our body needs to maintain its current weight). Without a caloric deficit fat loss is literally impossible.
A caloric deficit is induced via a combination of diet and exercise, ab exercises can assist you in burning calories to place you in a deficit to lose fat… but if you’re eating too much there’s no colossal number of sit-ups, leg raises or planks that’ll get you the six pack abs you desire.
5. The Back Bridge
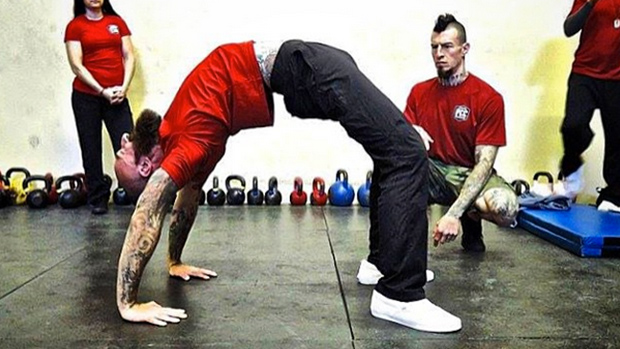
The back bridge, originally a yoga pose is a timeless exercise which is rarely performed (correctly) in the gym these days. The basic bridge variations are often used as a form of rehab for those recovering from back and shoulder injuries, however in this post we're going to be discussing and working our way up to the full bridge - an exercise which Paul Wade stresses as one of the key foundational bodyweight exercises in his book 'Convict Conditioning'.
Bridges themselves can be dangerous when performed with careless form, however when done correctly they'll assist you in forging a bulletproof back and unmatched flexibility... whether you're an athlete, a casual gym-goer or a bodybuilder there's no reason why this old school bodyweight exercise should be left out of your workout regime.
Back Bridge Exercise Benefits
“If I had to name the most important strength-building exercise in the world, it would be the bridge. Nothing else even comes close.” - Paul Wade, author of Convict Conditioning
So, what benefits does the back bridge provide that deems it so highly rated by a master of bodyweight training such as Paul Wade?
Reduce Back Pain & Restore Mobility After Long Stints Sitting Down
Sitting down in an office from 9 - 5 day in day out does your back no favors. In order to maintain mobility, prevent injury and feel good we need to move. While sitting down we often hunch over, use bad posture and compress our back and hip flexors... the bridge is not only the ultimate strengthening exercise for the back, it's also the best stretch for your back day - if you're an office worker or spend a large portion of your day in a immobile in a chair the back bridge should not only be in youe workout regime but also a staple in your morning and evening routine.
Prepare The Spine For Explosive, Taxing Movements Such As The Deadlift
Warming up before performing any exercise is important, in order to grease the groove, get your muscles warm and prepare for the onslaught of the workout that's about to occur. This point is stressed even more when we're talking about heavy, taxing compound exercises such as the deadlift, squat and pendlay row.
Foam rolling and dynamic stretching is key, as discussed in the back bridge progression below we're going to be performing dynamic movements with the back bridge - instead of holding one bridge pose for a period of time just like any other exercise, it's all about the repetitions baby!
Engaging Literally Every Single Muscle In Your Back
Unlike the back extension the back bridge engages the entire back when performed in the later progressions. Most back exercises and stretches merely isolate a portion of the back... the bridge on the other hand works EVERYTHING. Your entire back, hamstrings, posterior chain, shoulder flexibility (the later variations can do wonders for your rotator cuffs when performed for repetitions).
Reduce Your Risk Of Back Injury By Strengthening The Spine
As Convict Conditioning coach Paul Wade stresses in the video below, the back bridge is the ultimate functional strength builder which results in a bulletproof foundation when it comes time to rip those heavy deadlifts. The push-up and pull-up are fantastic and are extremely popular because they work vanity muscles - if you're able to do one arm push-ups or one arm pull-ups you'll have an armour plated physique to show for it - back bridges on the other hand are quite the opposite. The strength, flexibility, mobility and foundation built via this exercise is unparalleled - but you do not get any aesthetics to show for it.
Functionality over aesthetics, the back bridge is a staple exercise.
Back Bridge Progressions
Here's a great guide demonstrating the progressions from beginner to the master exercise progression shown above utilizing 10 progressions. Remember, the back bridge like any other exercise should be performed for repetitions, not just a static hold. Raise yourself into the back bridge progression, lower yourself down and then raise yourself up for the desired number of repetitions, the static hold often seen when we talking about bridges is the eastern yoga style, not the bulletproof back strengthening version we're discussing here.
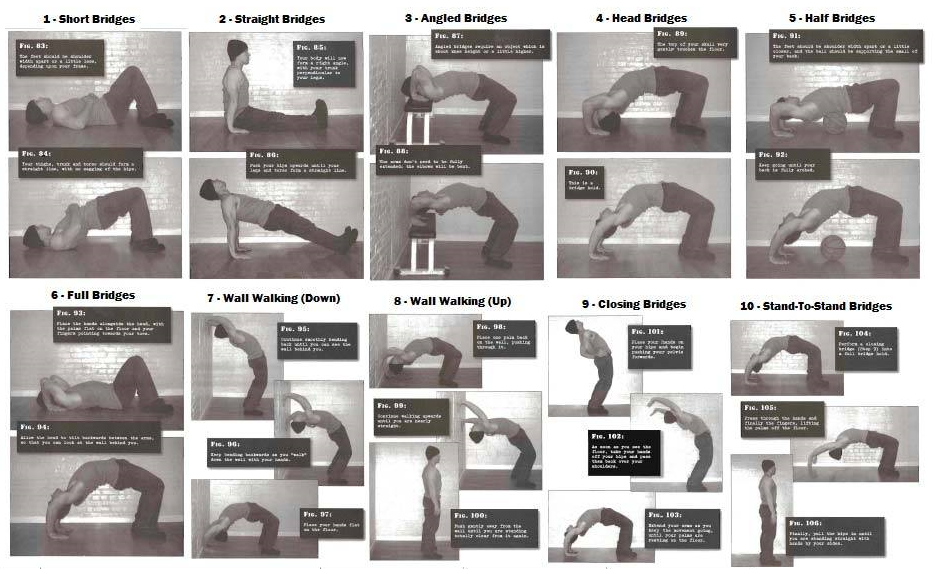
Progression 1 - Short Bridges
The very first step in mastering the bridge.
This is essentially a glute bridge - focusing on raising your lower body off the ground while maintaining your upper back and shoulder position on the floor.
Progression 2 - Straight Bridges
The straight bridge has you lifting your shoulders and back off the ground while maintaining straight arms. This variation is essentially a plank.
Progression 3 - Angled Bridges
Angled bridges are the first step to the full bridge, working in a limited range of motion to build flexibility and your confidence in getting into the bridge position.
Progression 4 - Head Bridges
Starting with you head on the ground (do not hold your weight on your head!) assume a bridge position, once again this is almost the full bridge however we're working a limited range of motion.
Progression 5 - Half Bridges
Assume your position using a basket ball or similar - raise and lower your body using down to and up off the ball.
Progression 6 - Full Bridges
The full bridge! At this stage you're more flexible and mobile than most people will ever be. Starting on the ground without any assistance from balls or a limited range of motion raise and lower your body into a complete arch, feeling the stretch through your entire posterior chain.
Progression 7 - Wall Walking (Down)
Now we're taking the full bridge to the wall - ensure you're a far enough distance away from the wall and begin to walk your hands down until you reach the floor. At this stage DO NOT walk back up the wall (as that is quite a step up) focus on performing reps of the downward walk first.
Progression 8 - Wall Walking (Up)
A reverse of the downward walk. This time we're starting in a full bridge position and walking our way up the wall, completing the second half of the wall walk. At this stage you should be able to walk both down and up the wall without any assistance or limiting of your range of motion.
Progression 9 - Closing Bridges
Almost there! At this stage we're performing 3/4 of the entire bridge however we're allowing our body to fall the final portion of the range, catching ourselves with our hands in position to assume the full bridge.
Progression 10 - Stand-To-Stand Bridges
The echelon of success. The master stage. Once you've reached the stand-to-stand bridge your back strength and mobility will be second to none.
From a standing position without the assistance of a wall lean back and work your way down to a full bridge before proceeding back up to a complete standing position.
6. Captains Chair Leg Raise
The best ab exercise out there for gym-goers is the leg raise.
To perform hanging leg raises all time all you need is your body and a captains chair or bar.
The fitness industry is constantly pushing consumerism, you honestly don’t need ab king pros or any crazy equipment to build a great physique (funnily enough all of those isolation ab exercises with equipment net you virtually no results… but more on that a bit later!). I remember watching videos on YouTube about 5 or 6 years ago on ‘how to get abs’ and ‘how to build a ripped core’ of course the information I found was useful – eating acai berries and doing 100 sit-ups twice a day is NOT the way to get abs or even develop functional core strength… needless to say I spent a couple of years wasting my time with sit-ups, sit-ups and more sit-ups, until one day I discovered the hanging leg raise. If you only perform one abdominal exercise make sure it’s the leg raise or one of its many variations.
Movement: Isolation
Targets: Abdominals
Required: Captains Chair
Optional: N/A
Captains Chair Leg Raise Form
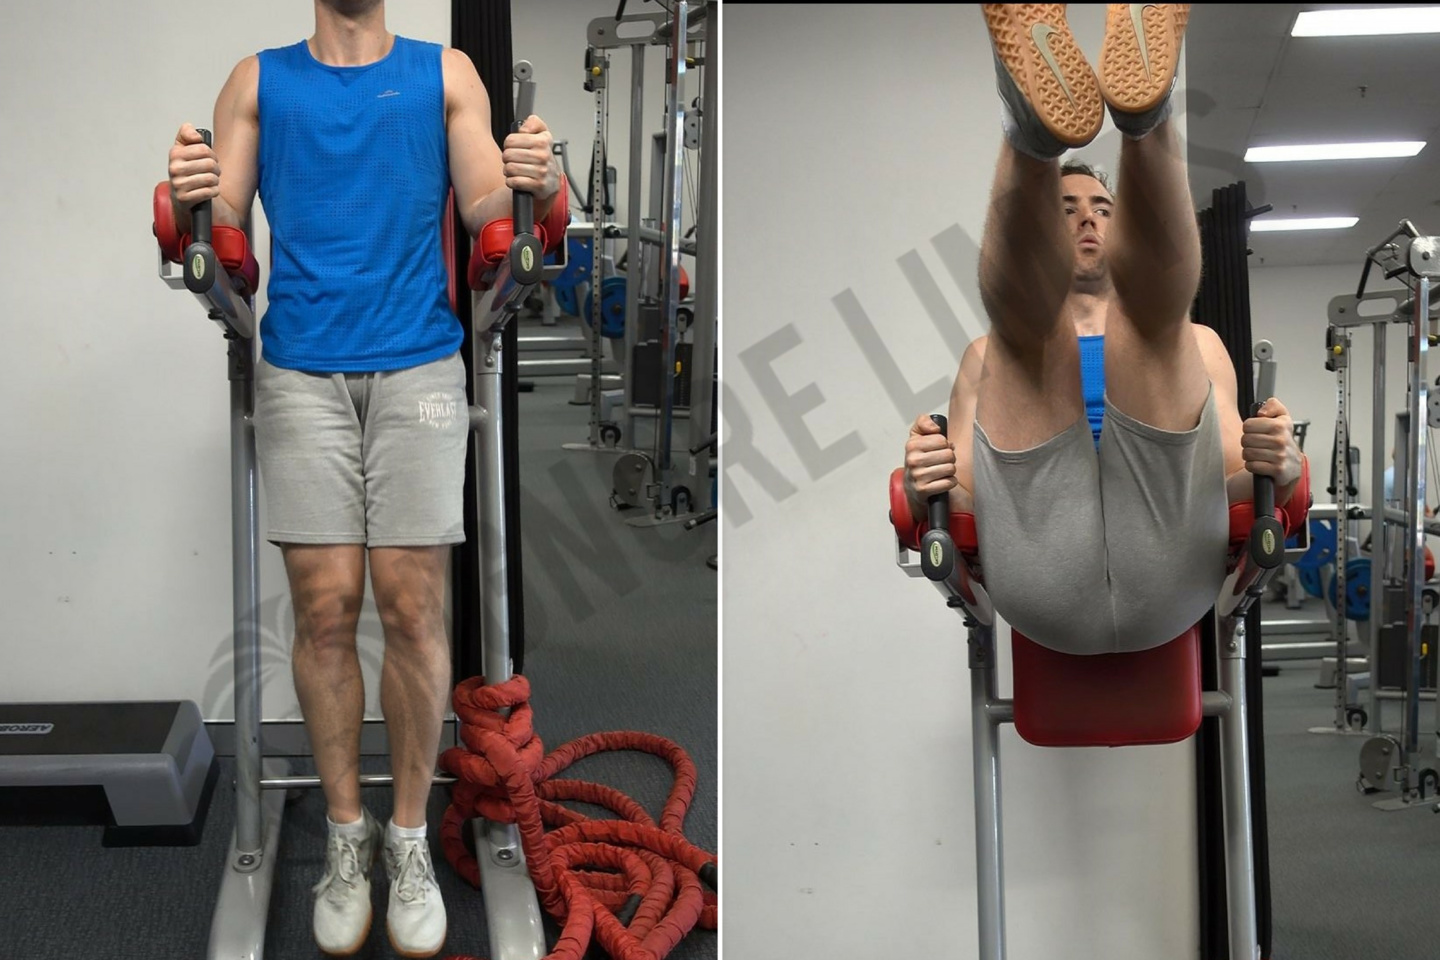
Hold onto the handles of your captains chair.
While keeping your core tight bend your knees and lift them up as high as possible.
Slowly lower your legs back down – the key to avoid swinging on the negative (downwards) portion of each rep is to consciously think about keeping your abs tight for the entire duration.
Tip: you want to form at minimum an L shape with your body, the higher up you can get your knees the better, but aim for at least 90 degrees.
Captains Chair Leg Raise Variations
Captains Chair Bent Knee Leg Raise
A slightly easier variation of the Captains chair raise, maintain a 90 degree bend in your knees while raising your legs to reduce the difficulty of the exercise.
Captains Chair Straight Leg Raise
An advanced variation of the Captains Chair raise, maintain completely straight legs for the duration of the repetition to increase the difficulty and tension on the abdominal region.
Putting It All Together... My Dryland Swim Workout
Perform the following regime 2 - 3 times per week (have at least 24 - 48 hours rest between workouts).
Dumbbell Shoulder Press (Alternating) - 4 Sets - 8 to 10 Reps
Pull-Ups - 4 Sets - 'till failure
Dumbbell Goblet Squat - 4 Sets - 8 to 10 Reps
Russian Twist - 4 Sets - 20 Reps
Captains Chair Leg Raise - 4 sets - 15 Reps
Finish off by working on your back bridge progressions.